Preface
Because Docker Desktop started to charge (Docker Subscription Service Agreement | Docker) (Docker CLI is still free), but the free plan is a little bit strict, and we use it usually for business, to avoid extra expense for a company, I started to study another solution. On the other hand, WSL2 is well developed; we don’t need too much cost to run Linux service on a Windows server.
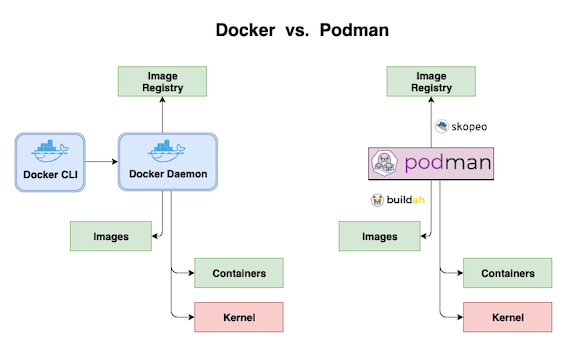
The most significant difference between Podman and Docker(2022/03) is their architecture. Docker is a client-server base and needs a daemon to operate all containers created by Docker; however, Podman does not need a daemon. So that it can avoid the single point of failure; once a daemon dies, its child will bury together. But the main pros. Of Podman, rootless is no longer anymore since the Docker engine upgrades to 20.10.[ref].
Here is a great illustration

Image source: podman_introduction
First step
=========== ↓↓↓ 25/07/2022 Update ↓↓↓ ==============
For now, Podman has a more efficient way to install it on Windows. It will be like Docker; you can execute Podman directly in terminal/pwsh/cmd after installation.
The latest version is Podman 4.1.1. The MSI download link, which in the release tab, it’s simple to install. The only you need to do is to click. After you click, you can execute podman in pwsh to output the information.
But~ the whole installation isn’t finished yet. We need a host server to let podman run (eg, a virtual machine).
When you execute the command podman machine init in pwsh, the output shows it installs a fedora distro and podman inside. Also, it generates an SSH key to connect to that machine, giving you a better user experience; you can operate the podman in a Windows environment. It still lives in a Linux container; you do not need to start this container and execute podman manually. That’s cool. In the virtual machine named podman-machine-default, you can use the wsl -l -v command to check the distro installed on your computer.
| |
Use the command podman machine init to initialize the environment the first time. After initializing, all you have to do is podman machine start or podman machine stop to turn on/off the virtual machine.
=========== ↑↑↑ ↑↑↑ ===========
Official document: Install WSL | Microsoft Docs
Make sure you install WSL first if you are a Windows user. If you do not install it before, you’ll be required to restart the machine after executing the command below.
Command:
wsl --install => Install WSL (Needs to open a terminal as admin)
Change the default version to version 2
wsl --set-default-version 2
List versions that offer online (basically, you can check on Windows Store, there are more choices)
wsl --list --online
Install specific version
wsl --install -d <Distro>
List all Linux distros status on the machine.
wsl --list --verbose
Terminate specific Linux distros
wsl -t {dist. name}
After install and setup WSL, we are halfway to playing with Podman.
Change install location
WSL will use disk space in C drive (%LOCALAPPDATA%\Packages). If you do not have enough space, you will need export, import, and unregister these commands, especially the latest Ubuntu (22.04) will cost at least 1.5GB of disk space.
wsl -l -v
Check what Linux distro you have installed on your local machine.
wsl --export {Distribution Name} {backup name including path}
The first argument is the distro name of the virtual hard disk you want to move. The second one is the output file name.
wsl --unregister {Distro name}
Remove the distro, which exports on the previous command, and avoid name conflict when we import the distro in the next step.
wsl --import {Distro name} {InstallLocation} {TarFileName}
The first argument is the name of this distro. If you do not remove (unregister) the previous distro, it will cause a name conflict; it will ask you for another name that you have not used before. The second argument is where you want to place your virtual hard disk. The third argument is the full location path that you exported earlier.
PodMan
Official document here
We use Ubuntu to install. Assuming you have already installed Ubuntu with WSL2, then start the Ubuntu distro with the command below:
wsl.exe -d Ubuntu
Update and upgrade packages after you enter bash
Command 1: Update & upgrade your packages
| |
Command 2: Captcher your OS info
| |
Command 3: Register a new apt-get source since the source does not offer podman
| |
Command 4: fetch the Public Key that the source need
| |
Command 5: import Public Key into apt-get
| |
Command 6: Update and upgrade packages again, and install podman
| |
Command 7
| |
Command 8: setting config file, add Docker.io as the image source
| |
If you reference this one as I do, for now (2022/3/28), the default behavior will not generate .config folder and setting file inside the folder automatically; you can check the issue 5722.
For now, podman is ready to rock. We can execute the commands below to check
Executing podman run -dt -p 8080:80/tcp docker.io/library/httpd in Ubuntu distro, it will fetch image from DockerHub.
Then execute curl http://localhost:8080 or use the browser to visit http://localhost:8080. It will show the information below
| |
You will get rootless:false when executing podman info directly. If you want to run as non-root, you have to switch accounts when you start a distro. That means the default login account is admin.
You can use su {user name} to switch accounts when you use Ubuntu.
Use Podman to run a MSSQL
After we have tried an HTTP server, we can use podman to run an MSSQL and connect it from the local host.
podman pull mcr.microsoft.com/mssql/server:2022-latest
The disk will be automatically mounted, so we can use local storage as DB, using the -v parameter to mount a folder to make the container access local resources. But be aware that location is recognized as its path, not the host path.
Then execute the command below to make MSSQL for the Linux container running. ACCEPT_EULA and SA_PASSWORD are required fields
podman run -e "ACCEPT_EULA=Y" -e "SA_PASSWORD=Passw0rd" -e "MSSQL_PID=Express" --name mymssql -p 3341:1433 -v /mnt/c/where/you/mount/data:/var/mssql/data:Z -d mcr.microsoft.com/mssql/server:2019-latest
Great! We have done the job.
Before using IDE to connect MSSQL on Windows, we can log in to MSSQL to check.
podman exec -it mymssql "bash"
According to the default image, we can use the default account mssql to log in.
Because the tool, sqlcmd, does not add into the container’s PATH, you need to invoke with full path.
/opt/mssql-tools/bin/sqlcmd -S localhost -U SA -P "Passw0rd"
You can enter the container’s MSSQL server shell when all of this success.
SELECT host_platform, host_distribution,host_release FROM sys.dm_os_host_info
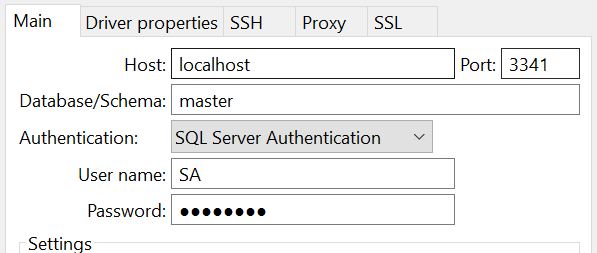
If you are using an IDE, you can see the screenshot below:

Okay~ for now, we can use GUI to access DB to operate some T-SQL.
For this article, we use DBeaver, not SSMS, because there are some differences between DBeaver and SSMS when connected to DB.

You might say: “That is great, but most of my work runs on Windows. Can I use existing DB?”
That’s for sure, and it is pretty simple.
But it’s clearer to understand the container’s point of view.
When you start the container, we assume you mount the volume, an MDF file, and a relative Log file. Then we execute the container’s sqlcmd.
| |
After that, you can check via GUI. Now your database is ready to serve.
If you want to detach DB, please execute the command below:
| |
If you want to access it via application, here is one thing you have to note. Use the IP address on the distro, not the Windows. To connect to MSSQL in a container, please get the IP via the ifconfig command in a distro. Using the account/password to log in, and the connection string will look like this Server={ip},{port};User ID={user name};Password={pwd};Initial Catalog={db name};Integrated Security=false;, you can access DB in a container by this way.
Now we are all set~ MSSQL for Linux ❤ So wonderful~
Public images
Reference
- Get podman up and running on Windows using Linux | Opensource.com
- GitHub - containers/podman: Podman: A tool for managing OCI containers and pods.
- Install WSL | Microsoft Docs
- Podman - Introduction
- How to run Podman on Windows with WSL2 | Enable Sysadmin (redhat.com)
- managing_containers
- Quay => another container image registry service
- Quickstart: Run SQL Server container images with Docker
- different-methods-to-attach-sql-server-mdf-files
- Docker overview | Docker Documentation